UITableView等高Cell的实例
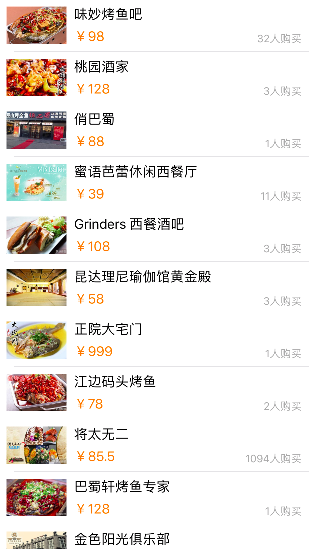
需要做一个如下效果的实例,每个Cell都是相同的内容,布局以及高度
新建一个iOS Single App工程
将ViewController继承改为UITableViewController
将storyboard中的ViewController控件删除,放置一个TabelViewController控件,将其类名设置为ViewController,并设置为初始View
以下是数据的plist文件
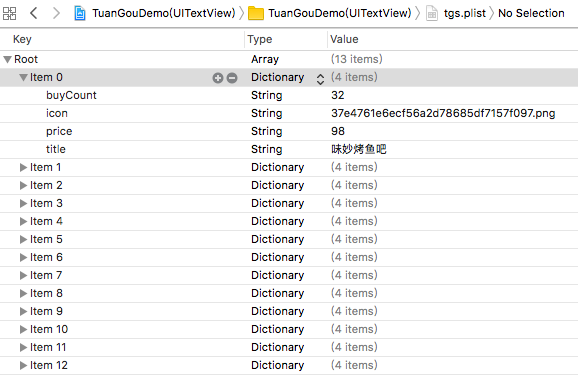
根据plist的数据结构创建数据模型:
ZFDataMode.h
#import <Foundation/Foundation.h>

@interface ZFDataMode : NSObject

@property(strong,nonatomic)NSString *icon;
@property(strong,nonatomic)NSString *title;
@property(strong,nonatomic)NSString *price;
@property(strong,nonatomic)NSString *buyCount;

+ (instancetype)dataWithDict:(NSDictionary*)dict;

@end
ZFDataMode.m
#import "ZFDataMode.h"

@implementation ZFDataMode

+ (instancetype)dataWithDict:(NSDictionary*)dict
{
    ZFDataMode *data = [[ZFDataMode alloc] init];
    data.icon = dict[@"icon"];
    data.title = dict[@"title"];
    data.price = dict[@"price"];
    data.buyCount = dict[@"buyCount"];
    return data;
}

@end
根据概念图创建自定义Cell
布局方式一:布局方式采用Frame设置,因此布局设置必须在layoutSubviews方法中进行
ZFTableViewCell.h
#import <UIKit/UIKit.h>

@class ZFDataMode;

@interface ZFTableViewCell : UITableViewCell

- (instancetype)initWithFrame:(CGRect)frame;
- (instancetype)initWithStyle:(UITableViewCellStyle)style reuseIdentifier:(NSString *)reuseIdentifier;
- (void)layoutSubviews;

- (void)configWithModel:(ZFDataMode*) model;

@end
ZFTableViewCell.m
#import "ZFTableViewCell.h"
#import "ZFDataMode.h"

@interface ZFTableViewCell()

@property (weak, nonatomic)UIImageView *iconImageView;
@property (weak, nonatomic)UILabel *titleLabel;
@property (weak, nonatomic)UILabel *priceLabel;
@property (weak, nonatomic)UILabel *buyCountLabel;

@end

@implementation ZFTableViewCell

- (instancetype)initWithFrame:(CGRect)frame
{
    if(self = [super initWithFrame:frame])
    {
        NSLog(@"initWithFrame");
    }
    return self;
}

- (instancetype)initWithStyle:(UITableViewCellStyle)style reuseIdentifier:(NSString *)reuseIdentifier
{
    if(self = [super initWithStyle:style reuseIdentifier:reuseIdentifier])
    {
        UIImageView *iconImageView = [[UIImageView alloc]init];
        [self.contentView addSubview:iconImageView];
        self.iconImageView = iconImageView;

        UILabel *titleLabel = [[UILabel alloc]init];
        [self.contentView addSubview:titleLabel];
        self.titleLabel = titleLabel;
        self.titleLabel.font = [UIFont systemFontOfSize:18];

        UILabel *priceLabel = [[UILabel alloc]init];
        [self.contentView addSubview:priceLabel];
        self.priceLabel = priceLabel;
        self.priceLabel.font = [UIFont systemFontOfSize:18];
        self.priceLabel.textColor = [UIColor orangeColor];

        UILabel *buyCountLabel = [[UILabel alloc]init];
        [self.contentView addSubview:buyCountLabel];
        self.buyCountLabel = buyCountLabel;
        self.buyCountLabel.font = [UIFont systemFontOfSize:14];
        self.buyCountLabel.textAlignment = NSTextAlignmentRight;
        self.buyCountLabel.textColor = [UIColor lightGrayColor];
    }
    return self;
}

- (void)configWithModel:(ZFDataMode*) model
{
    self.iconImageView.image = [UIImage imageNamed:model.icon];
    self.titleLabel.text = model.title;
    self.priceLabel.text = [NSString stringWithFormat:@"¥%@",model.price];
    self.buyCountLabel.text = [NSString stringWithFormat:@"%@人购买",model.buyCount];
}

- (void)layoutSubviews
{
    [super layoutSubviews];
    CGFloat space = 10;

    CGFloat iconImageX = space;
    CGFloat iconImageY = space;
    CGFloat iconImageW = 80;
    CGFloat iconImageH = self.contentView.frame.size.height - 2 * space;
    self.iconImageView.frame = CGRectMake(iconImageX, iconImageY, iconImageW, iconImageH);

    CGFloat titleLabelX = iconImageX + iconImageW + 10;
    CGFloat titleLabelY = iconImageY;
    CGFloat titleLabelW = self.contentView.frame.size.width - titleLabelX - space;
    CGFloat titleLabelH = 20;
    self.titleLabel.frame = CGRectMake(titleLabelX, titleLabelY, titleLabelW, titleLabelH);

    CGFloat priceLabelW = 100;
    CGFloat priceLabelH = 20;
    CGFloat priceLabelX = titleLabelX;
    CGFloat priceLabelY = iconImageX + iconImageH - priceLabelH;
    self.priceLabel.frame = CGRectMake(priceLabelX, priceLabelY, priceLabelW, priceLabelH);

    CGFloat buyCountLabelW = 150;
    CGFloat buyCountLabelH = 14;
    CGFloat buyCountLabelX = titleLabelX + titleLabelW - buyCountLabelW;
    CGFloat buyCountLabelY = iconImageY + iconImageH - buyCountLabelH;
    self.buyCountLabel.frame = CGRectMake(buyCountLabelX, buyCountLabelY, buyCountLabelW, buyCountLabelH);
}

@end
ViewController.m
#import "ViewController.h"
#import "ZFTableViewCell.h"
#import "ZFDataMode.h"

@interface ViewController ()

@property(strong, nonatomic)NSArray<ZFDataMode*> *tableDatas;

@end

@implementation ViewController

NSString *cellId = @"cell";

- (void)viewDidLoad {
    [super viewDidLoad];
}

- (BOOL)prefersStatusBarHidden
{
    return YES;
}

- (NSArray *)tableDatas
{
    if(_tableDatas == nil)
    {
        NSMutableArray *datas = [NSMutableArray array];
        NSArray<NSDictionary*> *tempArr = [NSArray arrayWithContentsOfFile:[[NSBundle mainBundle] pathForResource:@"tgs" ofType:@"plist"]];
        NSLog(@"%@",tempArr);
        for(NSDictionary *dict in tempArr)
        {
            ZFDataMode *dataMode = [ZFDataMode dataWithDict:dict];
            [datas addObject:dataMode];
        }
        _tableDatas = datas;
    }
    return _tableDatas;
}

- (NSInteger)numberOfSectionsInTableView:(UITableView *)tableView
{
    return 1;
}

- (NSInteger)tableView:(UITableView *)tableView numberOfRowsInSection:(NSInteger)section
{
    return self.tableDatas.count;
}

- (UITableViewCell *)tableView:(UITableView *)tableView cellForRowAtIndexPath:(NSIndexPath *)indexPath
{
    ZFTableViewCell *cell = [tableView dequeueReusableCellWithIdentifier:cellId];

    if(cell == nil)
    {
        cell = [[ZFTableViewCell alloc]initWithStyle:UITableViewCellStyleDefault reuseIdentifier:cellId];
        [cell configWithModel:self.tableDatas[indexPath.row]];
    }

    return cell;
}

- (CGFloat)tableView:(UITableView *)tableView heightForRowAtIndexPath:(NSIndexPath *)indexPath
{
    return 70;
}

@end
关于自定义cell也可以用注册cell类的方式
ViewController.m 修改
- (void)viewDidLoad {
    [super viewDidLoad];

    [self.tableView registerClass:[ZFTableViewCell class] forCellReuseIdentifier:cellId];
}

- (UITableViewCell *)tableView:(UITableView *)tableView cellForRowAtIndexPath:(NSIndexPath *)indexPath
{
    ZFTableViewCell *cell = [tableView dequeueReusableCellWithIdentifier:cellId];

    //这里无需if(cell == nil)判断
    cell = [[ZFTableViewCell alloc]initWithStyle:UITableViewCellStyleDefault reuseIdentifier:cellId];
        [cell configWithModel:self.tableDatas[indexPath.row]];

    return cell;
}
布局方式二,采用AutoLayout布局,使用Mesonry框架实现
ZFTableViewCell.m修改
//头部设置如下宏和头文件
//define this constant if you want to use Masonry without the 'mas_' prefix
#define MAS_SHORTHAND

//define this constant if you want to enable auto-boxing for default syntax
#define MAS_SHORTHAND_GLOBALS
#import "Masonry.h"

//AutoLayout布局无需在layoutSubviews中再设置,而是在控件的父级View一经决定就可以设置,因此修改如下部分
- (instancetype)initWithStyle:(UITableViewCellStyle)style reuseIdentifier:(NSString *)reuseIdentifier
{
    if(self = [super initWithStyle:style reuseIdentifier:reuseIdentifier])
    {
        CGFloat space = 10;

        UIImageView *iconImageView = [[UIImageView alloc]init];
        [self.contentView addSubview:iconImageView];
        self.iconImageView = iconImageView;

        [iconImageView makeConstraints:^(MASConstraintMaker *make) {
            make.top.equalTo(self.contentView).offset(space);
            make.left.equalTo(self.contentView).offset(space);
            make.bottom.equalTo(self.contentView).offset(-space);
            make.width.equalTo(80);
        }];

        UILabel *titleLabel = [[UILabel alloc]init];
        [self.contentView addSubview:titleLabel];
        self.titleLabel = titleLabel;
        self.titleLabel.font = [UIFont systemFontOfSize:18];

        [titleLabel makeConstraints:^(MASConstraintMaker *make) {
            make.top.equalTo(iconImageView.top).offset(0);
            make.left.equalTo(iconImageView.right).offset(space);
            make.height.equalTo(20);
            make.right.equalTo(self.contentView).offset(space);
        }];

        UILabel *priceLabel = [[UILabel alloc]init];
        [self.contentView addSubview:priceLabel];
        self.priceLabel = priceLabel;
        self.priceLabel.font = [UIFont systemFontOfSize:18];
        self.priceLabel.textColor = [UIColor orangeColor];

        [priceLabel makeConstraints:^(MASConstraintMaker *make) {
            make.bottom.equalTo(self.contentView).offset(-space);
            make.left.equalTo(iconImageView.right).offset(space);
            make.width.equalTo(100);
            make.height.equalTo(20);
        }];

        UILabel *buyCountLabel = [[UILabel alloc]init];
        [self.contentView addSubview:buyCountLabel];
        self.buyCountLabel = buyCountLabel;
        self.buyCountLabel.font = [UIFont systemFontOfSize:14];
        self.buyCountLabel.textAlignment = NSTextAlignmentRight;
        self.buyCountLabel.textColor = [UIColor lightGrayColor];

        [buyCountLabel makeConstraints:^(MASConstraintMaker *make) {
            make.right.equalTo(self.contentView).offset(-space);
            make.bottom.equalTo(priceLabel.bottom).offset(0);
            make.width.equalTo(150);
            make.height.equalTo(14);
        }];
    }
    return self;
}
方式三:采用XIB方式定义Cell,AutoLayout实现
根据概念图在XIB中搭建模型,根控件是UITableViewCell

然后做好AutoLayout布局
ViewController.m 修改
- (void)viewDidLoad {
    [super viewDidLoad];

    [self.tableView registerNib:[UINib nibWithNibName:NSStringFromClass([ZFTableViewCell class]) bundle:nil] forCellReuseIdentifier:cellId];
}

- (UITableViewCell *)tableView:(UITableView *)tableView cellForRowAtIndexPath:(NSIndexPath *)indexPath
{
    ZFTableViewCell *cell = [tableView dequeueReusableCellWithIdentifier:cellId];

    //无需cell = [[ZFTableViewCell alloc]initWithStyle:UITableViewCellStyleDefault reuseIdentifier:cellId];
    [cell configWithModel:self.tableDatas[indexPath.row]];

    return cell;
}
方式四:storyboard自定义控件,AutoLayout布局
在storyboard TableView控件中拖入一个TableViewCell,按照概念图布局控件

ViewController.m 修改
- (void)viewDidLoad {
    [super viewDidLoad];

    self.tableView.rowHeight = 70;
}

- (UITableViewCell *)tableView:(UITableView *)tableView cellForRowAtIndexPath:(NSIndexPath *)indexPath
{
    static NSString *cellId = @"cell";
    // 访问缓存池
    XMGTgCell *cell = [tableView dequeueReusableCellWithIdentifier:cellId];

    [cell configWithModel:self.tableDatas[indexPath.row]];

    return cell;

}
使用MJExtension将数据转模型
ViewController.m 修改
- (NSArray *)tableDatas
{
    if (!_tableDatas) {

        //读取的plist文件只限于mainBundle
        _tableDatas = [ZFDataMode mj_objectArrayWithFilename:@"tgs.plist"];

        /**
        也可以是
        NSMutableArray *datas = [NSMutableArray array];
        _tgs = [ZFDataMode mj_objectArrayWithKeyValuesArray:datas];
        */
    }
    return _tgs;
}
/** 即可代替如下代码
- (NSArray *)tableDatas
{
    if(_tableDatas == nil)
    {
        NSMutableArray *datas = [NSMutableArray array];

        NSArray<NSDictionary*> *tempArr = [NSArray arrayWithContentsOfFile:[[NSBundle mainBundle] pathForResource:@"tgs" ofType:@"plist"]];
        NSLog(@"%@",tempArr);
        for(NSDictionary *dict in tempArr)
        {
            ZFDataMode *dataMode = [ZFDataMode dataWithDict:dict];
            [datas addObject:dataMode];
        }
        _tableDatas = datas;
    }
    return _tableDatas;
}
*/