消息推送
什么是消息推送:
- 可以理解为,向用户推送一条信息来通知用户。
- NSNotification是抽象的,不可见的,是一种模式,推送通知是可见的,有界面显示
推送通知的作用:
- 可以在App退到后台,或者关闭时,继续推送一条消息告诉用户一些信息
应用场景:
- 一些任务管理App,会在任务时间即将到达,通知你做该任务
- 健身App提醒你该健身了
- 比如电影App,半小时前提醒你,某电影即将开始
- QQ,微信等
本地通知
- 本地通知可以理解为:无需联网,也可推送消息
- 通知发送方:开发人员在App内发送
- 应用场景,确定知道未来某个时间点应该提醒用户什么
远程通知
- 与本地通知相对,必须在联网的状态下才能接受到的消息推送
- 远程推送服务,也叫APNs(Apple Push Notification Services)
- 通知发送方:服务器
注意:
- 向某App发送消息推送的时候,如果该App处于前台运行,该消息不会被呈现出来
- 惦记推送通知后,默认会打开发出推送消息的App
发送本地通知
iOS9.0之前的本地通知
import UIKit

class ViewController: UIViewController {

    override func viewDidLoad() {
        super.viewDidLoad()
    }

    @IBAction func sendNotice(_ sender: Any) {

        //注意:如果是iOS8.0之前,一下代码可以发送一个本地消息
        //但是,iOS8.0之后,需要向用户请求授权,见AppDelegate
        let localNotice = UILocalNotification()
        localNotice.alertBody = "喧了个荒"
        //10秒以后发送消息
        localNotice.fireDate = NSDate(timeIntervalSinceNow: 10) as Date

        UIApplication.shared.scheduleLocalNotification(localNotice)
    }

    @IBAction func cancelSendNotice(_ sender: Any) {

        //取消所有计划的消息
        UIApplication.shared.cancelAllLocalNotifications()
    }

    @IBAction func checkNotice(_ sender: Any) {

        guard UIApplication.shared.scheduledLocalNotifications != nil else {
            print("没有通知")
            return
        }

        //查看还没有推送出去的消息
        print(UIApplication.shared.scheduledLocalNotifications!)
    }
}
iOS8.0之后,需要向用户请求授权
import UIKit

@UIApplicationMain
class AppDelegate: UIResponder, UIApplicationDelegate {

    var window: UIWindow?

    func application(_ application: UIApplication, didFinishLaunchingWithOptions launchOptions: [UIApplicationLaunchOptionsKey: Any]?) -> Bool {

        registerAuthor()
        return true
    }

    func registerAuthor() {

        //swift中枚举的或必须使用rawValue才能执行或运算
        if #available(iOS 8.0, *) {
            let types = UIUserNotificationType.alert.rawValue | UIUserNotificationType.badge.rawValue | UIUserNotificationType.sound.rawValue
            let sets = UIUserNotificationSettings(types:UIUserNotificationType(rawValue: types), categories: nil)
            UIApplication.shared.registerUserNotificationSettings(sets)
        }

    }

}
iOS10.0之后的本地推送 User Notifications Framework
要使用User Notifications Framework的代码先引入import UserNotifications
第一步,授权
static let notificationCenter = UNUserNotificationCenter.current()

func application(_ application: UIApplication, didFinishLaunchingWithOptions launchOptions: [UIApplicationLaunchOptionsKey: Any]?) -> Bool {

    let options = UNAuthorizationOptions.alert.rawValue|UNAuthorizationOptions.badge.rawValue|UNAuthorizationOptions.sound.rawValue
    notificationCenter.requestAuthorization(options: UNAuthorizationOptions(rawValue: options)) { (isSuccess:Bool, error:Error?) in
        print("是否授权成功:\(isSuccess)")
    }

    return true
}
添加消息
创建UNMutableNotificationContent,然后可以指明各种属性。。 当然还可以在其中添加附件(UNNotificationAttachment),附件可以是音乐、视频、图片
创建触发器(Trigger)
触发器分为三种:
- UNTimeIntervalNotificationTrigger
- UNCalendarNotificationTrigger
- UNLocationNotificationTrigger
各种触发器的使用方式
//2分钟后提醒  UNTimeIntervalNotificationTrigger
let trigger1 = UNTimeIntervalNotificationTrigger.init(timeInterval: 120, repeats: false)

//每小时重复1次  UNTimeIntervalNotificationTrigger
let trigger2 = UNTimeIntervalNotificationTrigger.init(timeInterval: 3600, repeats: true)

//每周一早上8:00触发  UNCalendarNotificationTrigger
var components = DateComponents()
components.weekday = 2
components.hour = 8
let trigger3 = UNCalendarNotificationTrigger.init(dateMatching: components, repeats: true)

到达某个位置触发  UNLocationNotificationTrigger
let region = CLRegion()//记得导入MapKit框架
let trigger4 = UNLocationNotificationTrigger.init(region: region, repeats: false)
创建UNNotificationRequest。这个就是一个通知请求了。。 以后更新通知、删除通知就全靠他了
将UNNotificationRequest添加到通知中。 一个通知就完成了。
import UIKit
import UserNotifications

class ViewController: UIViewController {

    override func viewDidLoad() {
        super.viewDidLoad()

    }

    @IBAction func startNotice(_ sender: Any) {
        let content = UNMutableNotificationContent()
        content.title = "推送消息的标题"
        content.subtitle = "推送消息的副标题"
        content.body = "推送消息的主体"
        content.sound = UNNotificationSound.default()
        //content.sound = UNNotificationSound.init(named: "bell.mp3")//自定义铃声
        content.badge = 1
        content.categoryIdentifier = "category"
        content.launchImageName = "512"

        let trigger = UNTimeIntervalNotificationTrigger.init(timeInterval: 10, repeats: false)

        let request = UNNotificationRequest(identifier: "TimeSecond", content: content, trigger: trigger)

        AppDelegate.notificationCenter.add(request) { (error:Error?) in
            if error == nil {
                print("消息推送成功")
            }
        }
    }

    @IBAction func cancelNotice(_ sender: Any) {
        AppDelegate.notificationCenter.removeAllPendingNotificationRequests()
    }

}
添加附件
let path = Bundle.main.path(forResource: "512", ofType: "png")
let att = try? UNNotificationAttachment.init(identifier: "att", url: NSURL.fileURL(withPath: path!), options: nil)
content.attachments = [att!]
添加用户交互
func addUserInterface() {
    let action1 = UNTextInputNotificationAction(identifier: "action.input", title: "输入信息", options: .authenticationRequired, textInputButtonTitle: "输入", textInputPlaceholder: "你想要说些什么")
    let action2 = UNTextInputNotificationAction(identifier: "action.goodbye", title: "打开", options: .foreground)
    let action3 = UNTextInputNotificationAction(identifier: "action.close", title: "关闭", options: .destructive)

    let category = UNNotificationCategory(identifier: "category", actions: [action1,action2,action3], intentIdentifiers: [], options: .customDismissAction)
    let set:Set<UNNotificationCategory> = [category]
    AppDelegate.notificationCenter.setNotificationCategories(set)
}
此处的Action有两种,普通的UNNotificationAction 和 提供用户输入的UNTextInputNotificationAction,根据需求选择就行了。
通知中心可以注册很多这样的Category,那么如何确定某个通知使用哪一个呢? 这就是靠categoryIdentifier了,在很多地方都用到啦、 就是图片里面画红色线那个。。
想到前面设置UNMutableNotificationContent时候给出提示很重要的那个东西了么?
content.categoryIdentifier = @"catorgry";
就是这句话指明了category和某个通知的关联关系,所以,这里一定要对应起来
extension ViewController: UNUserNotificationCenterDelegate {

    //当App处于前台的时候收到通知的事件
    func userNotificationCenter(_ center: UNUserNotificationCenter, willPresent notification: UNNotification, withCompletionHandler completionHandler: @escaping (UNNotificationPresentationOptions) -> Void) {

    }

    //按钮点击事件会调用的方法
    func userNotificationCenter(_ center: UNUserNotificationCenter, didReceive response: UNNotificationResponse, withCompletionHandler completionHandler: @escaping () -> Void) {

    }
}
远程推送
- 什么是远程推送通知
- 顾名思义,就是从远程服务器推送给客户端的通知(需要联网)
- 远程推送服务,又称为APNs(Apple Push Notification Services)
- 为什么需要远程推送通知?
- 传统获取数据的局限性
- 只要用户关闭了app,就无法跟app的服务器沟通,无法从服务器上获得最新的数据内容
- 远程推送通知可以解决以上问题
- 不管用户打开还是关闭app,只要联网了,都能接收到服务器推送的远程通知
远程推送通知使用须知
- 所有的苹果设备,在联网状态下,都会与苹果的服务器建立长连接
- 什么是长连接
- 只要联网了,就一直建立连接
- 长连接的作用
- 时间校准
- 系统升级
- 查找我的iPhone
- 长连接的好处
- 数据传输速度快
- 数据保持最新状态


一.开发iOS程序的推送功能, iOS端需要做的事
- 请求苹果获得deviceToken
- 得到苹果返回的deviceToken,发送deviceToken给公司的服务器
- 监听用户对通知的点击
二.调试iOS的远程推送功能, 必备条件:
- 真机
调试推送需要的证书文件
- aps_development.cer : 某台电脑就能调试某个app的推送服务
- iphone5_qq.mobileprovision : 某台电脑就能利用某台设备调试某个程序
三.发布具有推送服务的app
- aps_production.cer : 如果发布的程序中包含了推送服务,就必须安装这个证书
- qq.mobileprovision : 某台电脑就能发布某个程序
下面是简单的注册远程推送的代码
import UIKit

@UIApplicationMain
class AppDelegate: UIResponder, UIApplicationDelegate {

    var window: UIWindow?

    func application(_ application: UIApplication, didFinishLaunchingWithOptions launchOptions: [UIApplicationLaunchOptionsKey: Any]?) -> Bool {

        if #available(iOS 8.0, *) {

            let types = UIUserNotificationType.alert.rawValue | UIUserNotificationType.badge.rawValue | UIUserNotificationType.sound.rawValue
            let set = UIUserNotificationSettings(types: UIUserNotificationType(rawValue: types), categories: nil)
            UIApplication.shared.registerUserNotificationSettings(set)
            UIApplication.shared.registerForRemoteNotifications()

        }
        else {

            let type = UIRemoteNotificationType(rawValue: UIRemoteNotificationType.alert.rawValue | UIRemoteNotificationType.badge.rawValue | UIRemoteNotificationType.sound.rawValue)
            UIApplication.shared.registerForRemoteNotifications(matching: type)

        }

        return true
    }

    //当请求完毕之后,会调用这个方法,把获取到的deviceToken返回给我们
    func application(_ application: UIApplication, didRegisterForRemoteNotificationsWithDeviceToken deviceToken: Data) {
        //将deviceToken发送给要推送给App的服务器
        var tokenStr = (deviceToken as NSData).description

        let pattern = "<| |>"

        guard let regex = try? NSRegularExpression(pattern: pattern, options: []) else {
            return
        }

        tokenStr = regex.stringByReplacingMatches(in: tokenStr, options: [], range: NSRange(location: 0, length: tokenStr.count), withTemplate: "")

        print(tokenStr)
        print(tokenStr.count)//64
    }

    //接受到远程通知 App处于前台或后台切入前台时会调用
    func application(_ application: UIApplication, didReceiveRemoteNotification userInfo: [AnyHashable : Any]) {
        print("接受到远程通知")
    }

    //如果这个方法实现,前面的didReceiveRemoteNotification方法不会执行
    func application(_ application: UIApplication, didReceiveRemoteNotification userInfo: [AnyHashable : Any], fetchCompletionHandler completionHandler: @escaping (UIBackgroundFetchResult) -> Void) {
        print("接受到远程通知2")
    }

}
要让推送生效,还需做如下配置:
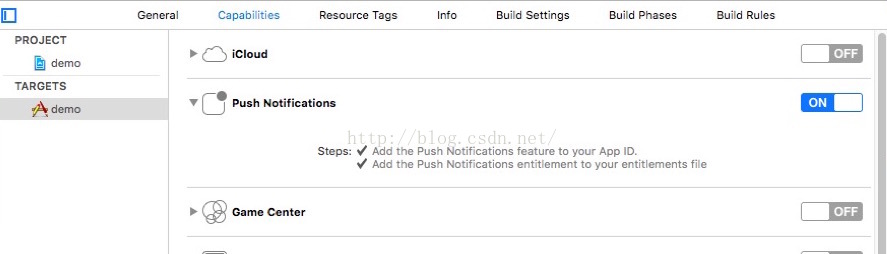
这样就多了一个文件

当前在前台时; 或者app在后台\app被彻底退出状态下,点击通知打开app进入前台; 都可以执行以下方法
func application(_ application: UIApplication, didReceiveRemoteNotification userInfo: [AnyHashable : Any], fetchCompletionHandler completionHandler: @escaping (UIBackgroundFetchResult) -> Void)
执行completionHandler 作用
- 系统会估量App消耗的电量,并根据传递的UIBackgroundFetchResult 参数记录新数据是否可用
- 调用完成的处理代码时,应用的界面缩略图会自动更新
如果想要接收到通知后,不要用户点击通知, 就执行以下代码, 那么必须有三个要求:
- 必须勾选后台模式Remote Notification ;
- 告诉系统是否有新的内容更新(执行完成代码块)
- 设置发送通知的格式("content-available":"随便传")